React Native: The Journey of a Beginner

"If you sit by the riverbank for a long time,
you will see the dead body of the framework,
which you have long wanted to learn, floating by."
Chinese folk wisdom
React Native is, perhaps, the most interesting and fast-evolving platform. Today you can create a new project based on its latest version, and in just a few months it will get outdated for a few releases. And if a year ago React Native was quite a raw product, now there are lots of plugins for dealing with native components as well as common React components.
Sources of information: where to start?
I recommend the book “Learning React Native: Building Native Mobile Apps with JavaScript” by Bonnie Eisenman. Despite the fact that the examples from the book are written using outdated syntax, it can be perfectly used as a guide to learning the basic principles of building applications on react-native. The book describes the entire process of creating an application, right up to the deploy to the store and provides a review of individual components: how and why to use them. The examples will help to strengthen the acquired knowledge - as copy-paste does not work here, you will have to rethink and rewrite them in a new way.
The next by importance source is: documentation. What is great here is that it is up to date. All new releases are described. All outdated methods are specified. Choose the tab “Building Projects with Native Code” and here we go!..
Well, and by no means an important hub for a react-native developer: stackoverflow.com.
Let’s make up the toolset for react
The most essential and commonly used React modules:
1. Redux
- react-redux,
- redux-logger - an indispensable tool for debugging,
- redux-saga - the best solution for managing side effects.
2. Selectors
- reselect - a library for selecting data from the application state and arranging them in the desired structure. It is convenient to take this logic out of the reducers and views to a special place.
3. Jest - a testing solution, it goes out of the box. The main thing is not to neglect and write tests =)
4. Eslint - a tool for unifying the coding style, as well as identifying silly and/or syntax errors.
RN utilities
The existing libraries for react-native may not remain unmentioned as they undoubtedly make developer’s life easier and let you avoid reinventing the wheel:
- react-native-splash-screen - creating a splash screen,
- react-native-fontawesome - using Font Awesome icons from icon font,
- react-native-radio-buttons - customizable radio-buttons,
- react-native-slider - a customizable range input slider,
- react-native-swiper - implementing a small gallery or slides,
- react-native-swipe-list-view - a listview where the rows can be swiped to reveal additional options.
To learn how to use the camera, photo/video library, downloading and sharing, check a nice article on medium and the following libraries:
- react-native-image-picker - using photos and videos from the phone library,
- react-native-camera - work with camera,
- react-native-video - video player.
The last three libraries require additional permissions on the phone, such as: access to the library, camera, local data storage. It should be noted that these permissions will be automatically requested from the user during app installation. The exception is the new (above the 6th) versions of Android. Therefore, we need to request the permission when an application wants to access related services. There is an example in the documentation that can be turned into a small library:
import { PermissionsAndroid, Platform } from 'react-native'

export const requestExternalStoragePermission = async (onSuccess, onError) => {
 // only for Android 6 and greater
 if ((Platform.OS === 'android') && (Platform.Version > 22)) {
  try {
   const granted = await PermissionsAndroid.request(
    PermissionsAndroid.PERMISSIONS.READ_EXTERNAL_STORAGE,
    {
     title: 'App read external storage Permission',
     message: `App needs access to your external storage
          so you can take keep your data.`
    }
   )
   if (granted === PermissionsAndroid.RESULTS.GRANTED) {
    onSuccess()
   } else {
    onError()
   }
  } catch (err) {
   console.warn(err)
  }
 } else {
  onSuccess()
 }
}
Here you can also store requests for access to the microphone and camera.
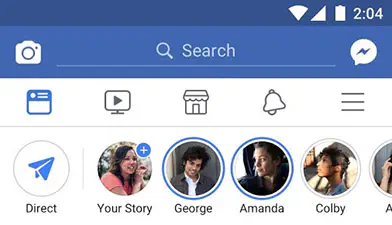
As you have probably noticed in the above example, we use the Platform module, which allows you to implement platform specific things. The most simple and wide-spread example is setting the status bar height:
Android (the Facebook app, for example):

iPhone (the Facebook app, for example):

The point is that, when calculating the screen height, we take the actual height of the device screen, however the real area available for the Android app is reduced by the height of the header at 20px (see the topmost bar in the picture). While in iOS the “header” overlays the application and does not take up additional space.
By the way, a feature of the React Native markup is the ability to easily get the height and width of the screen using the Dimensions module:
const height = Dimensions.get('window').height
const width = Dimensions.get('window').width
Well, it’s easy to get used to marking up with flexes. It is important to keep in mind that if the block has no specified width, height or flex > 0, then all internal elements will not be shown (!).
I can not help but mention one more thing that you will certainly use in your application - generating icons for Android and iOS applications. You need a thousand and one of them to make your application look beautiful on any device. Fortunately, having Node 6, ImageMagick and the original image of at least 200x200 pixels, you can get every imaginable icons through the command line. In two words three commands:
npm install -g yo generator-rn-toolbox
brew install imagemagick
yo rn-toolbox:assets --icon <path to your icon>
Additional JavaScript libraries:
- Ramda - the useful stuff here is dealing with different data structures, lenses;
- Moment - manipulations with dates.
Since the code is executed by JavaScript, there can be any set of libraries of the developer’s choice.
I could finish my article here by adding a few pretentious phrases like “everything works out of the box,” “a large community,” “a huge number of plugins.” However, the reality is that the first impression can be deceiving and it is necessary to go a long way in iOS app development and Android app development before getting a viable application that solves a real customer’s problem.
Pitfalls:
Possible errors in iOS:
- When creating a build in XCode, the build gets to Other Items, which makes it impossible to submit it to the AppStore.
The error occurs because of the additional libraries that you use in the project. When you create a new build, they are processed not as libraries, but as independent projects.
Solution: in all projects that are in the Library, you need to set:
"Build Setting": Skip install = yes`
- Missing project updates after making changes, “hang ups” and other unpredictabilities.
A possible reason is that the “clean project” in XCode does not completely remove the temporary files it created.
Solution: delete the temporary files manually. They are in the directory:
cd /Users/[local machine]/Library/Developer/Xcode/DerivedData/
- When creating the Archive for the AppStore, XCode swears at duplicate files.
This can happen if you use pod and React with its components inside it, as well as some of them directly from node_modules.
Solution: exclude files from the build by adding to ios/Podfile:
post_install do |installer|
 installer.pods_project.targets.each do |target|
  if target.name == "React"
   target.remove_from_project
  end
 end
end
For Android, it is desirable to bring all the libraries used in the project to one version.
Conclusion
A journey of a thousand miles begins with a single step.
Developing applications in React Native is an amazing process filled with new discoveries and the joy of how things can be built for other platforms in a different way. This is a new, yet emerging world where you are a pioneer, even if sometimes a pioneer of documentation.
Having mastered the basics, you can start designing your first application, asking yourself more and more new questions:
- What data should we store in the local storage?
- If the application is available online, how should it behave when there is no Internet connection?
- At what point do we receive/send data?
- What should the user see at this moment?
- How and which error messages should we display?
- What are the key features and functionalities that the application should have?
- What is the target audience for the application?
- What platform(s) should the application be built for?
- How can we ensure the security of the application and the user’s data?
- What are the potential risks and challenges in developing and launching the application?
Don't want to miss anything?
Subscribe and get stories like these right into your inbox.
Keep reading

Insights for Entrepreneurs Building a New POS System
An outdated POS system can slow down, become unresponsive, or lack modern payment processing and integration features. Learn when it’s time to upgrade or replace your system!

Pre-Populating Android Room Database on First App Launch: A Step-by-Step Guide
Learn how to prepopulate a Room database with a small data set on the first launch of a standalone app. This article provides a guide for achieving this without a backend.

Public and Private Blockchains: Key Differences
No matter your industry, you've likely heard plenty about blockchain and cryptocurrencies. Despite the buzz, this technology is still far from widespread adoption.
Contact us
Let's explore how our expertise can help you achieve your goals! Drop us a line, and we'll get back to you shortly.
