To integrate the payment gateway, follow these steps:
- Go to the eWAY Developers section.
- Click on the "create partner account" button.
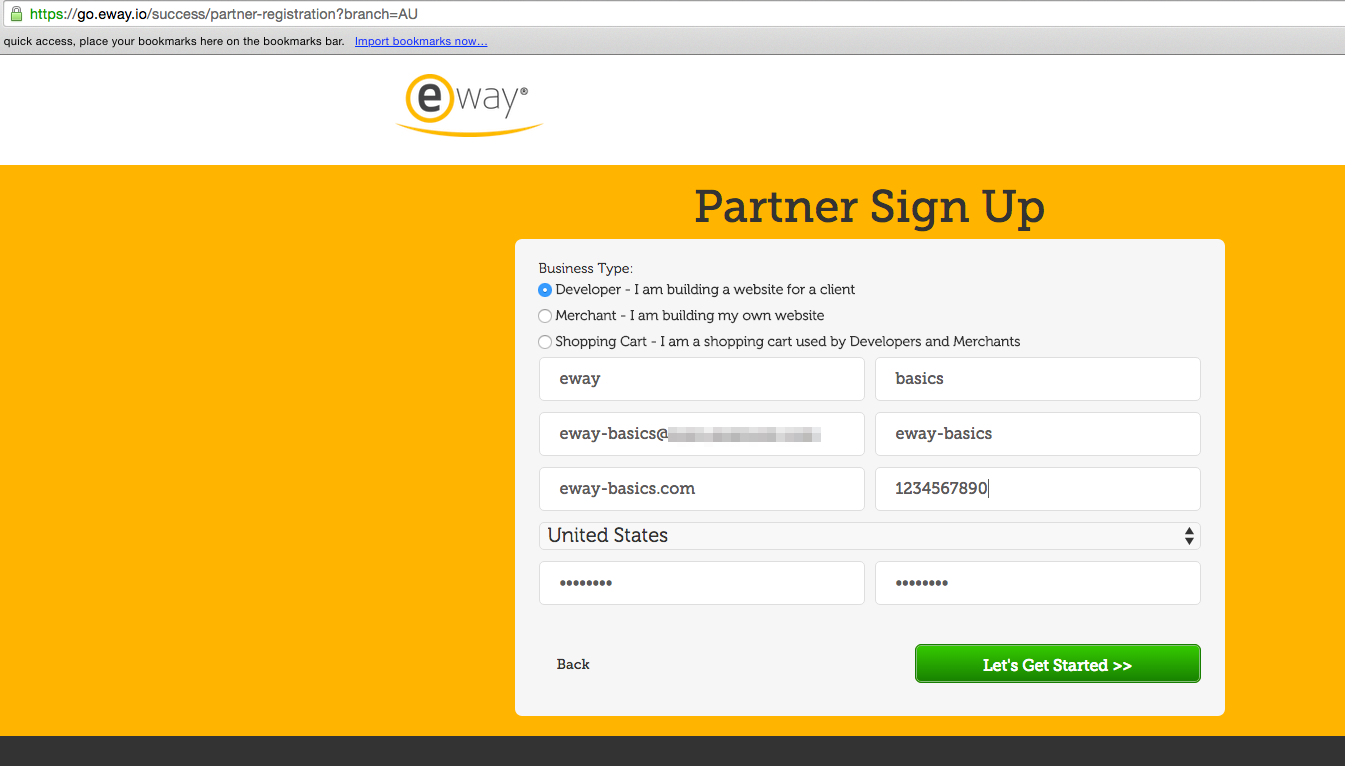
- Fill in the Partner Sign Up form:
- Go to the Partner portal.
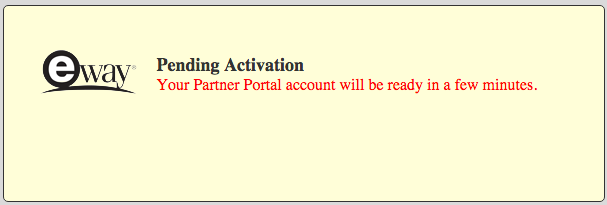
- If you see the following message, you will have to wait for some time:
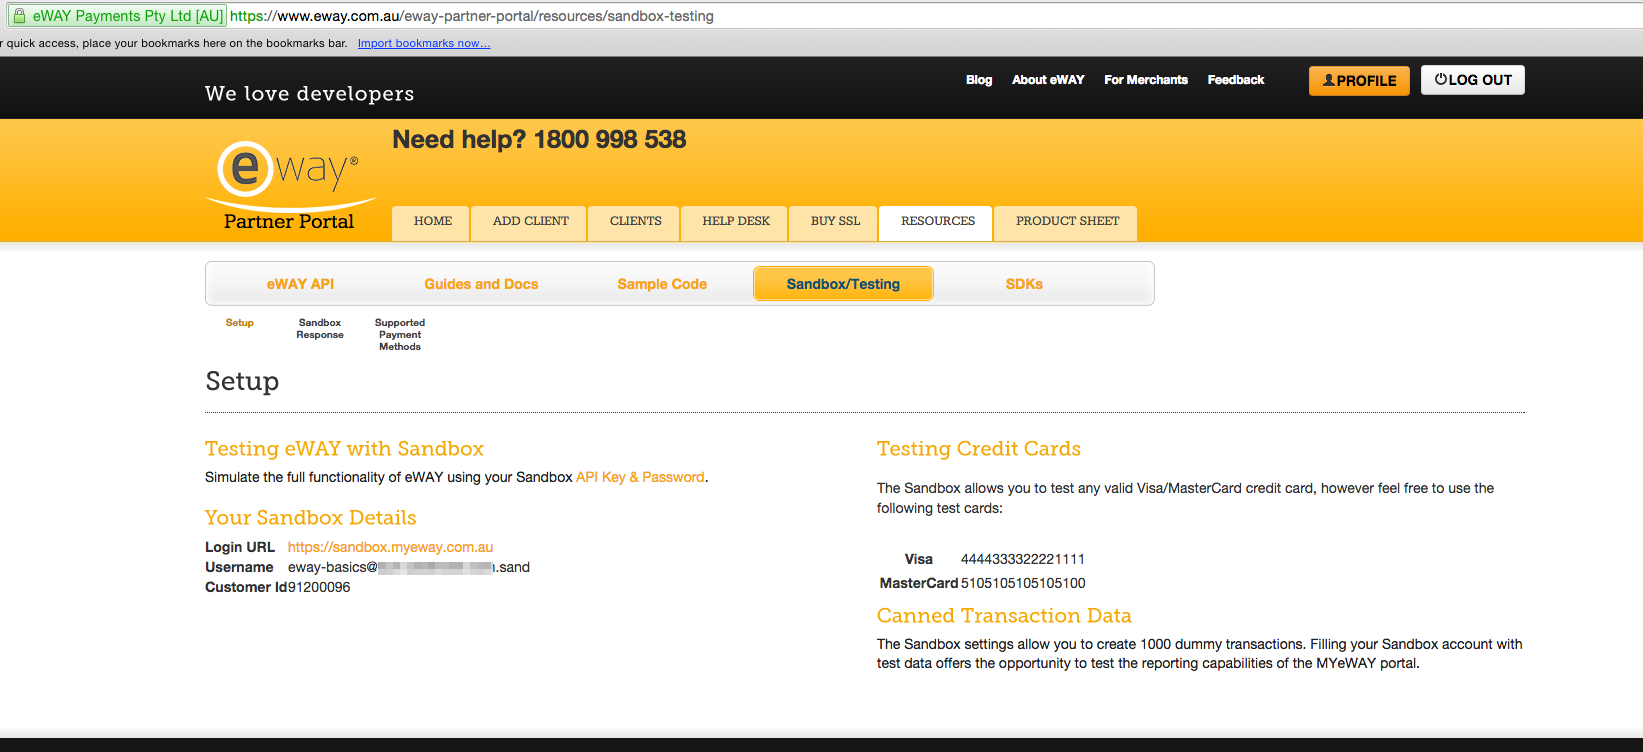
- Then you should go to the resources>sandbox-testing page.
- On this page you will see your Username for the Sandbox:
- Go to the Sandbox:
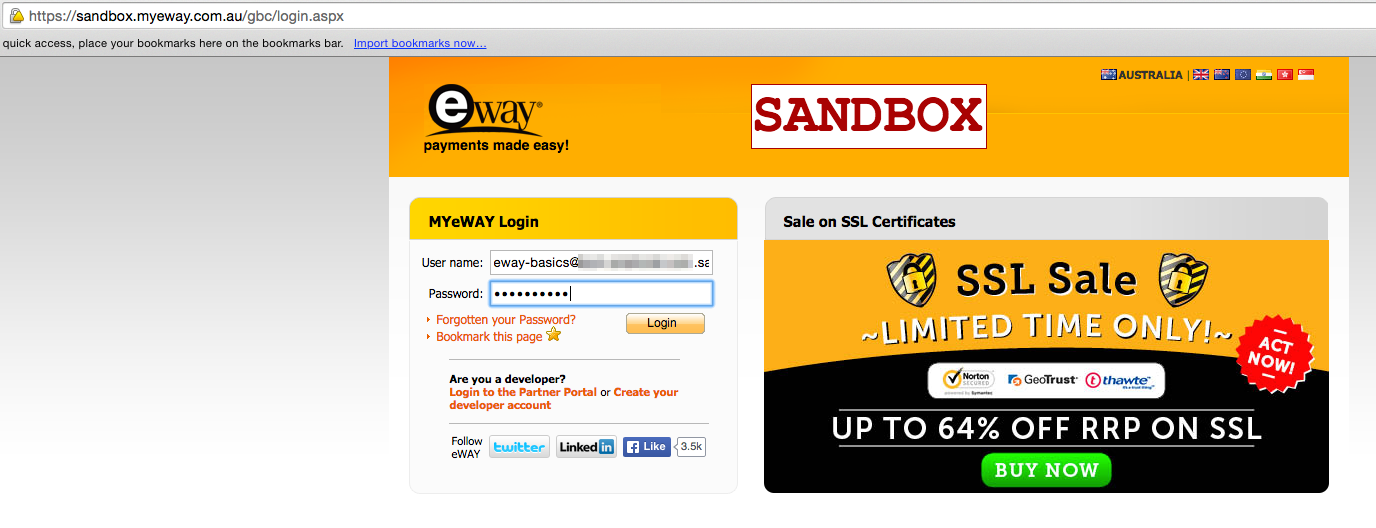
- To get to your account, use your password from the registration form and username from the previous screen:
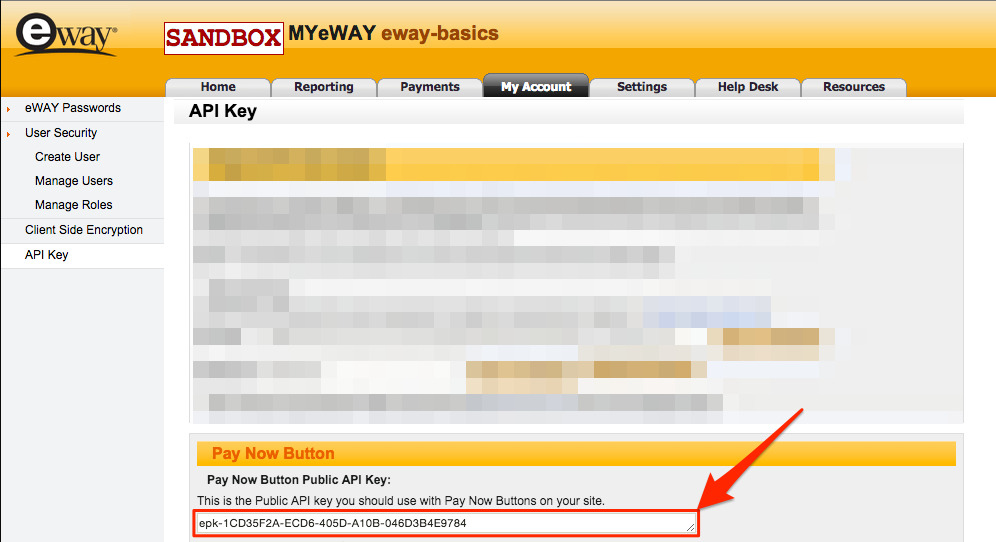
Pay Now button
This approach is the fastest and the easiest way to implement the payment gateway on your Ruby on Rails app. To apply it, we will need "Pay Now Button Public API Key". You can find it in your sandbox account on the management page.
Let’s add this key as a constant in the development environment:
/eway-basics/config/environments/development.rb
Rails.application.configure do
  config.cache_classes = false
  …
  config.assets.raise_runtime_errors = true
  EWAY_PAY_BUTTON_KEY = 'epk-1CD35F2A-ECD6-405D-A10B-046D3B4E9784'
end
Now we have to add a small snippet on our index page:
It was:
%tbody
  - orders.each do |order|
  %tr
      %td= order.id
      %td= link_to order.product, order_path(order)
      %td= number_to_currency(order.price, unit: "$")
      %td= human_boolean order.paid
      %td= order.created_at.strftime("%d/%m/%Y")
      %td
It became:
%tbody
  - orders.each do |order|
  %tr
      %td= order.id
      %td= link_to order.product, order_path(order)
      %td= number_to_currency(order.price, unit: "$")
      %td= human_boolean order.paid
      %td= order.created_at.strftime("%d/%m/%Y")
      %td
        %script{ src: "https://secure.ewaypayments.com/scripts/eCrypt.js", class: "eway-paynow-button", data: { publicapikey: EWAY_PAY_BUTTON_KEY, amount: order.price_in_cents, currency: "AUD" }}
By default, payments are processed in Australian dollars. You can easily change this setting by adding a currency key to hash of data attributes:
%script{ src: "https://secure.ewaypayments.com/scripts/eCrypt.js", class: "eway-paynow-button", data: { publicapikey: EWAY_PAY_BUTTON_KEY, amount: order.price_in_cents, currency: "AUD" }}
In the sandbox we are limited to only one currency.
eWay Pay Now button has many other configuration options, you can find the full list of them here.
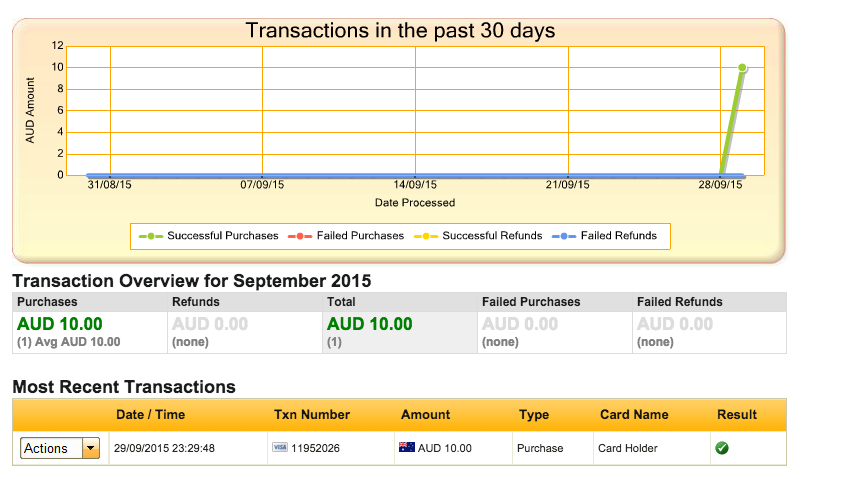
By clicking on the button, the user will be prompted to enter their payment information
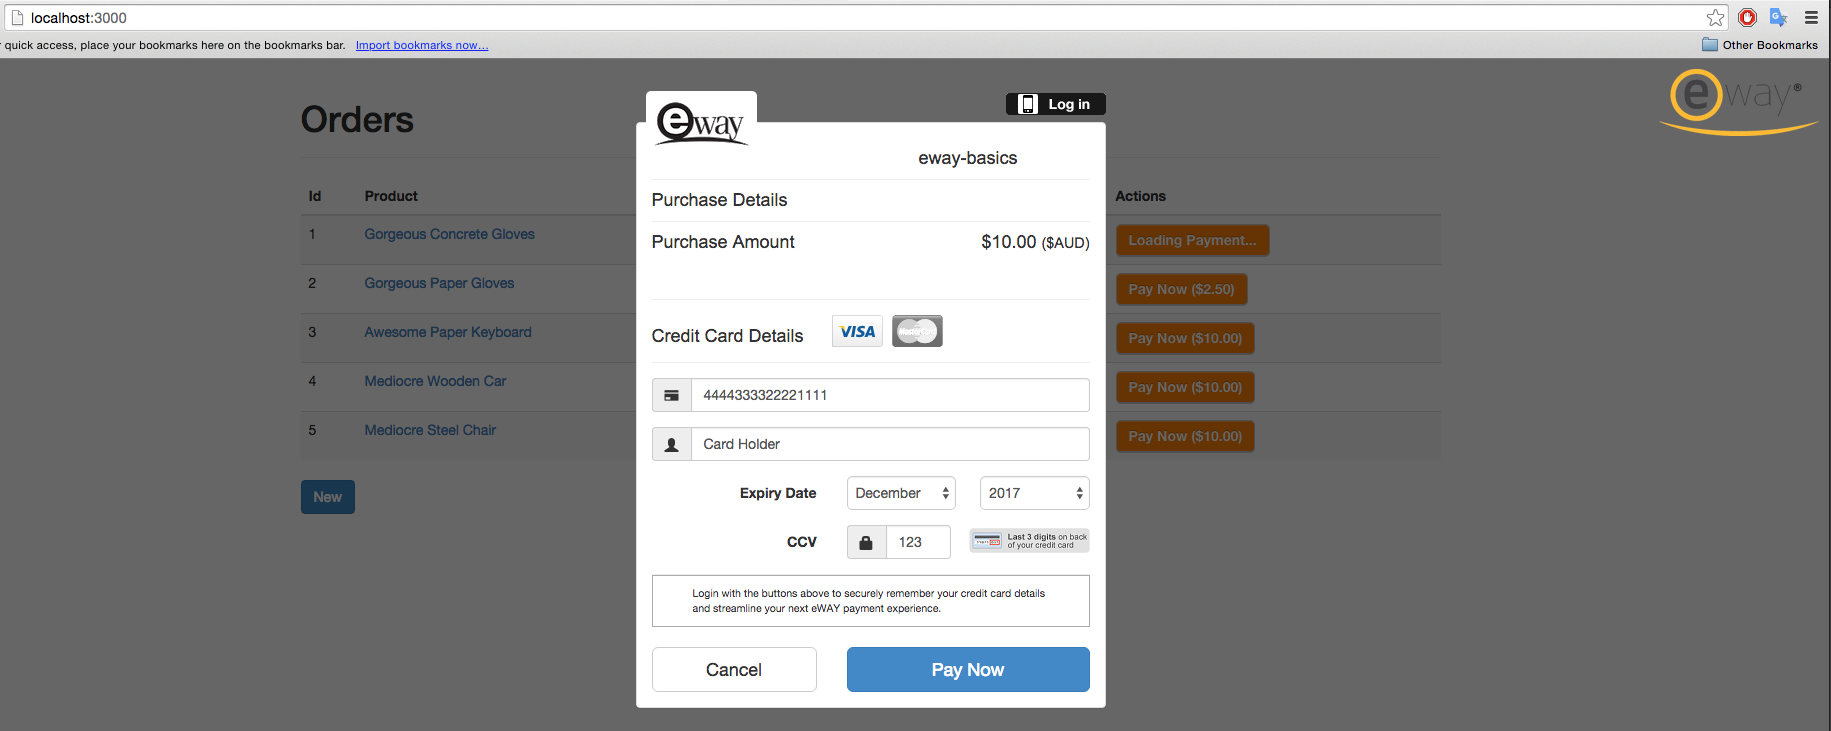 and, if the transaction goes through succesfully, the payment will appear on the statistics page.
 When working in the sandbox, a valid payment is $10 from a test Visa card.
If you have set "data-resulturl", the user will be redirected to this url when the transaction is completed.
Responsive Shared Page
Now, let's take an API key and password
 and set up our application to work with a fully functional page.
Add these data to:
/eway-basics/config/environments/development.rb
EWAY_API_KEY = 'F9802CLDSnmOLrbsY7sUIGYA6ugt50ks0bekkGUXQobgdHbuYjG3DGkUotYCP1fgZbDpqH'
EWAY_API_PASS = 'mUvnJZZS'
EWAY_SERVICE_URL = 'https://api.sandbox.ewaypayments.com'
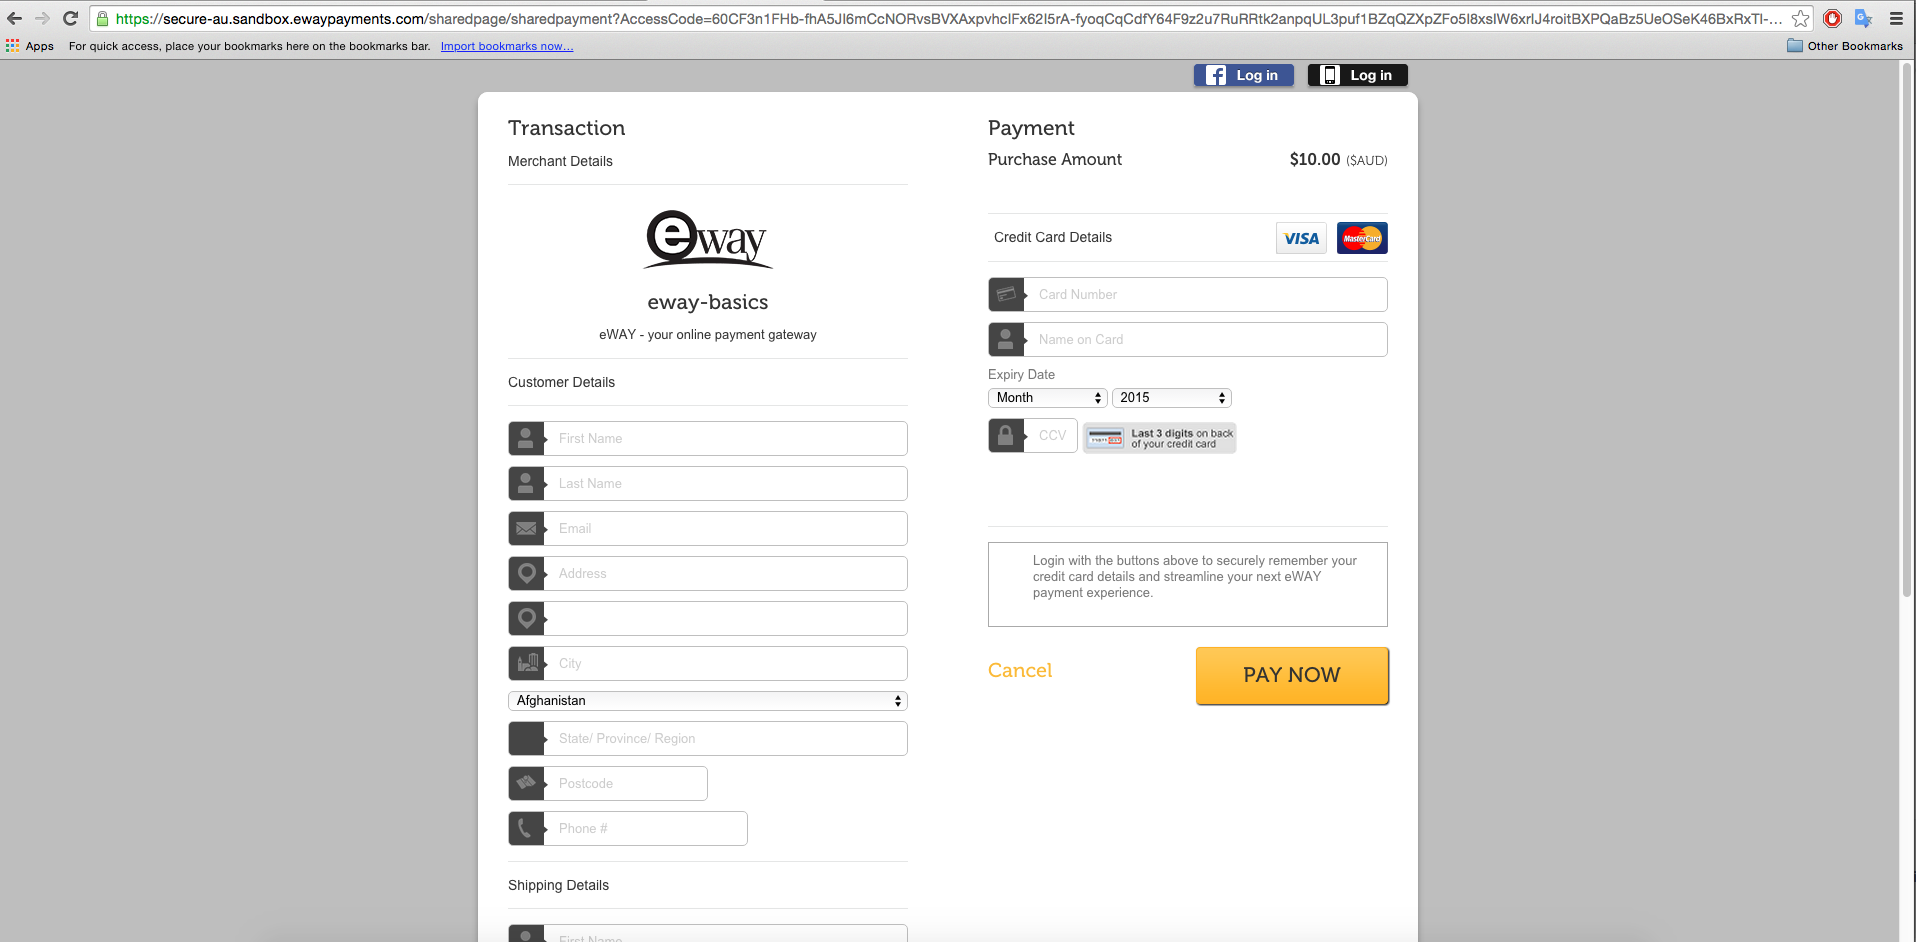
This page can be flexibly configured and can represent a different set of fields - from just a few lines to dozens (complete list can be found here).
But at first, let's add a new controller:
class CheckoutsController < ApplicationController
end
and a button that links to this controller.
Now we should create a configuration page. As was mentioned earlier, the set of options is quite extensive, so we will take the necessary minimum:
attrs = {
  Payment: {
     TotalAmount: order.price_in_cents
  },
  RedirectUrl: 'http://localhost:3000',
  CancelUrl: 'http://localhost:3000',
  Method: 'ProcessPayment',
   TransactionType: 'Purchase'
}
After that, we should make a request to the eWay API service. In our case to https://api.sandbox.ewaypayments.com.
For example:
result = nil
Curl::Easy.http_post("#{EWAY_SERVICE_URL}/AccessCodesShared", attrs.to_json) do |curl|
  curl.headers['Accept'] = 'application/json'
  curl.headers['Content-Type'] = 'application/json'
  curl.http_auth_types = :basic
  curl.username = EWAY_API_KEY
  curl.password = EWAY_API_PASS
  curl.verbose = true
  curl.on_complete {|response, err|
  result = response.body_str
  }
end
The response will be in json format:
{
  "SharedPaymentUrl":"https://secure-au.sandbox.ewaypayments.com/sharedpage/sharedpayment?AccessCode=44DD7OzqdHoQf6nP9arOyoUtnehQGSMVY7a0S2IyNj3KGRXMJMCi9hYGsl-0LVxTihqSw_1sDafZeN6qbxPLm_D-kMsT3sWm2rHIsPELrz_JIoaJ7VnKXorXychYeTX88jcaYmoetXvpe0CxqoQp4dVDpBg==",
  "AccessCode":"44DD7OzqdHoQf6nP9arOyoUtnehQGSMVY7a0S2IyNj3KGRXMJMCi9hYGsl-0LVxTihqSw_1sDafZeN6qbxPLm_D-kMsT3sWm2rHIsPELrz_JIoaJ7VnKXorXychYeTX88jcaYmoetXvpe0CxqoQp4dVDpBg==",
  "Customer":{
    "Title":"Mr.",
  ...
    "Fax":"",
    "Url":""
  },
  "Payment":{
    "TotalAmount":1000,
    "InvoiceNumber":"",
    "InvoiceDescription":"",
    "InvoiceReference":"",
    "CurrencyCode":"AUD"
  },
  "FormActionURL":"https://secure-au.sandbox.ewaypayments.com/AccessCode/44DD7OzqdHoQf6nP9arOyoUtnehQGSMVY7a0S2IyNj3KGRXMJMCi9hYGsl-0LVxTihqSw_1sDafZeN6qbxPLm_D-kMsT3sWm2rHIsPELrz_JIoaJ7VnKXorXychYeTX88jcaYmoetXvpe0CxqoQp4dVDpBg==",
  "CompleteCheckoutURL":"",
  "Errors":""
}
We extract SharedPaymentUrl from the response and redirect the user to this URL, where the payment page for the transaction is located.
 If we inspect this page, we can easily notice that the Cancel button contains URL, which was passed in the first request.
 Although the page seems blank and it looks like that we force the user to fill too many fields, it is not really so. We can pass the main part of the user data in the body of the first request. This reduces the number of required actions and the user only have to enter the credit card details.
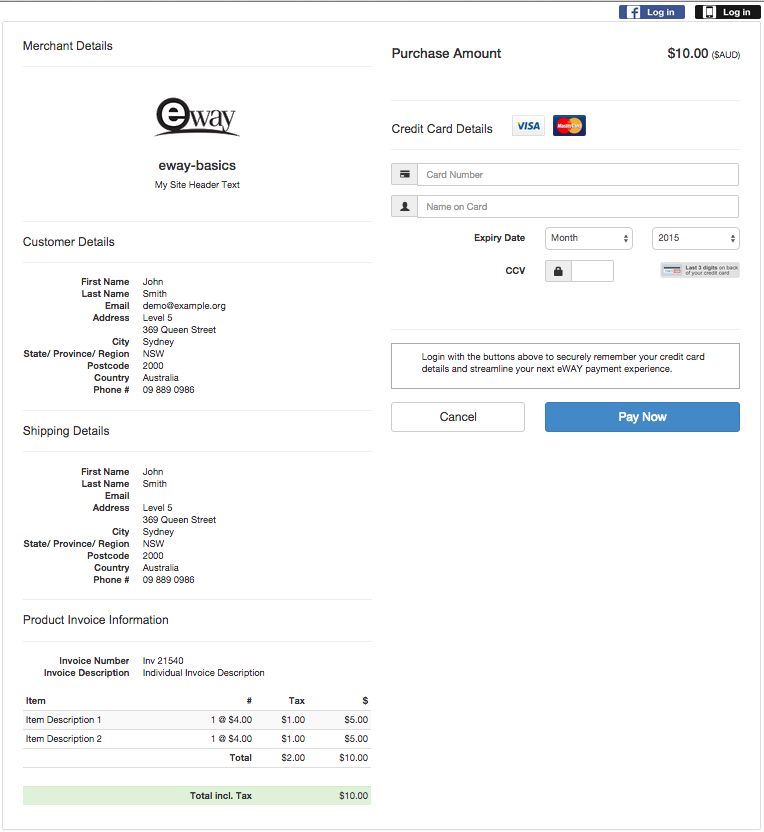 As in the first case, using the
 RedirectUrl allows to redirect the user to the results page, once a transaction has been completed.
Direct Connection
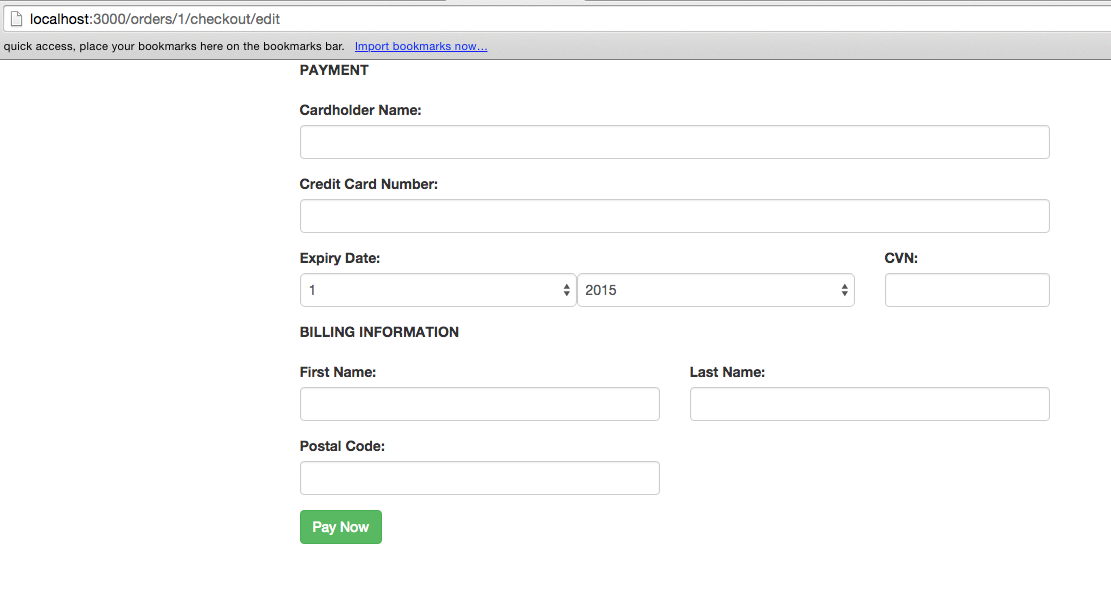
The last variant of integration considered in this article is the case, when you have a complete control over the form of payment and you include it as a part of your application page. To begin, you have to execute a request, similar to the one which we used to get SharedPaymentUrl. But this time we need two other keys – FormActionUrl (the URL that the form should be sent to) and AccessCode (a unique identifier). Now, let's create a form that will be used:
= form_for order, url: result['FormActionURL'], method: :post, html: { class: "form order" } do |f|
  = hidden_field_tag 'EWAY_ACCESSCODE', result['AccessCode']
  = hidden_field_tag 'EWAY_PAYMENTTYPE', 'Credit Card'
  .title-form
  %span
    %strong PAYMENT
  %br
  .row
  .col-md-8
    .form-group
      = label_tag 'EWAY_CARDNAME', 'Cardholder Name:', class: 'control-label'
      .controls
        = text_field_tag 'EWAY_CARDNAME', nil, class: 'form-control'
  .row
  .col-md-8
    .form-group
      = label_tag 'EWAY_CARDNUMBER', 'Credit Card Number:', class: 'control-label'
      .controls
        = text_field_tag 'EWAY_CARDNUMBER', nil, class: 'form-control'
  .row
  .col-md-6
    .form-group
      = label_tag 'EWAY_CARDEXPIRYMONTH', 'Expiry Date:', class: 'control-label'
      .controls
          .input-group-btn
          = select_tag 'EWAY_CARDEXPIRYMONTH', options_for_select((1..12).to_a), class: 'form-control'
          .input-group-btn
          = select_tag 'EWAY_CARDEXPIRYYEAR', options_for_select((Date.today.year..Date.today.year+10).to_a), class: 'form-control'
  .col-md-2
    .form-group
      = label_tag 'EWAY_CARDCVN', 'CVN:', class: 'control-label'
      .controls
        = password_field_tag 'EWAY_CARDCVN', nil, class: 'form-control'
At first, we put FormActionUrl in the URL. Then we need two hidden fields EWAY_ACCESSCODE and EWAY_PAYMENT. As you can see, all field names should be in uppercase with EWAY_ prefix. As a result, we will get the following form:
Now it is enough to fill in the form and send the request. It will end up with the page
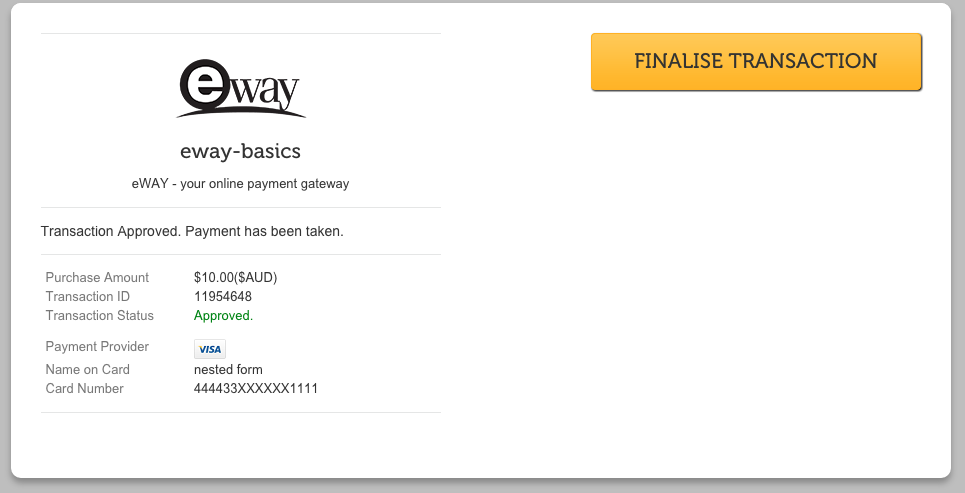 where the user can view the payment details. After clicking on "Finalise Transaction" the user will be sent to
 RedirectUrl (e.g. back to our application).
Utilities
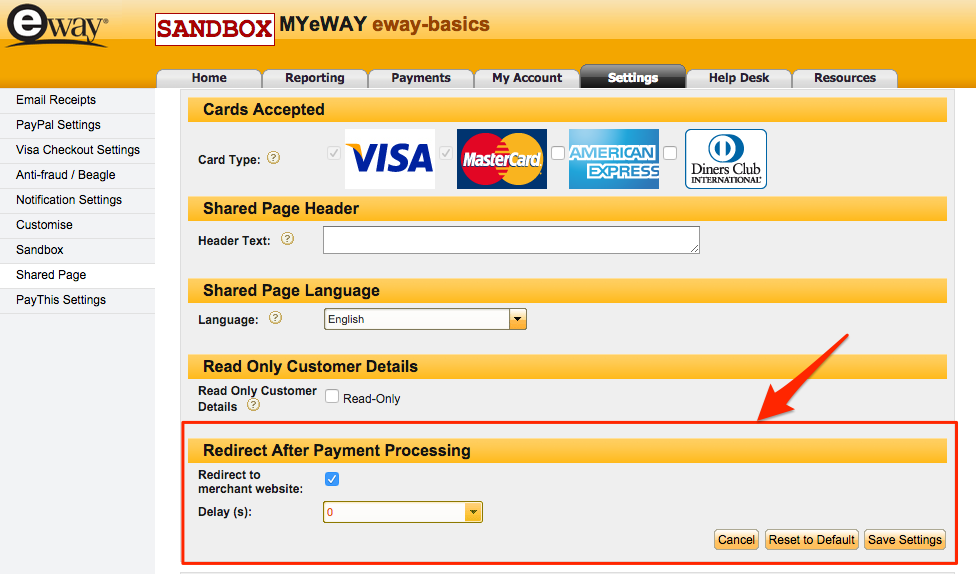
In most cases, we do not want to bother the user with additional actions or we want to show our confirmation page with the details. To achieve this, we need the redirect to be done automatically (without clicking on the Finalise Transaction) and pass the correct URL, to which the user should be redirected. At first, let's make auto-completion. To do it, we log in to our account in the sandbox and change the setting:
Then we add one more controller which will process the response from the EWAY server:
order_finalize GET /orders/:order_id/finalize(.:format) finalizes#show
Next, we have to set RedirectUrl in the preliminary request.
attrs = {
  Payment: {
      TotalAmount: order.price_in_cents
  },
  RedirectUrl: order_finalize_url(order),
  CancelUrl: 'http://localhost:3000',
  Method: 'ProcessPayment',
    TransactionType: 'Purchase'
  }
This way, after making the payment, the user will be redirected to order_finalize_url(order) with an additional parameter
?AccessCode=60CF3fZryW_vHZ1orbE7mhppeLg6CroLWn7WS4sRnnr39fz6PDcO3lnKAXJYv0bC9EKYmI8kWs_29eC8hJ7EsMJtnRCJLjETyAizEr_F7XeguWE1U1N1FvPKOrNJQYi_cFcUE-BddNHE6djze_LeeinvHcA==
This code enables us to get access to the details of our transaction, we just need to execute the following request:
@result = nil
Curl::Easy.http_get("#{EWAY_SERVICE_URL}/AccessCode/#{params[:AccessCode]}") do |curl|
  curl.headers["Accept"] = "application/json"
  curl.headers["Content-Type"] = "application/json"
  curl.http_auth_types = :basic
  curl.username = EWAY_API_KEY
  curl.password = EWAY_API_PASS
  curl.verbose = true
  curl.on_complete {|response, err|
  @result = response.body_str
  }
end
The response contains all the necessary information:
{
  "AccessCode":"60CF3fZryW_vHZ1orbE7mhppeLg6CroLWn7WS4sRnnr39fz6PDcO3lnKAXJYv0bC9EKYmI8kWs_29eC8hJ7EsMJtnRCJLjETyAizEr_F7XeguWE1U1N1FvPKOrNJQYi_cFcUE-BddNHE6djze_LeeinvHcA==",
  "AuthorisationCode":"936260",
  "ResponseCode":"00",
  "ResponseMessage":"A2000",
  "InvoiceNumber":"",
  "InvoiceReference":"",
  "TotalAmount":1000,
  "TransactionID":11954681,
  "TransactionStatus":true,
  "TokenCustomerID":null,
  "BeagleScore":0,
  "Options":[
  ],
  "Verification":{
  …
  },
  "BeagleVerification":{
  …
  },
  "Errors":null
}
We should pay attention to the ResponseMessage. This key contains codes that describe the result of the transaction. For example, A2000 – "Transaction Approved". V6021 – EWAY_CARDHOLDERNAME Required – the user forgot to enter the cardholder's name, and so on. Depending on the response and the status of the transaction, you will be able to choose what to do: either to show a confirmation page, or allow the user to re-enter the information. The RedirectUrl in this case depends on the order, so if the transaction is completed successfully, we can change the status to "paid", for example. The status "paid" will allow to block a double payment by crediting funds to the balance or by sending a notification.
Well, that's it for what is the payment gateway integration for eWay.
Summary
Taking payments online is a quite straightforward process. We have reviewed three possible options for eWay - Pay Now Button, Responsive Shared Page and Direct Connection. These options differ in ease of use, flexibility, available features and you may choose which one suits your needs the best. Hopefully, this article has helped you to learn the specifics of eWay payment gateway integration on Ruby on Rails app and to pick the right payment solution.
Related article: 7 PayPal Alternatives For Your Business